Summary and Setup
This lesson provides an overview of the fundamentals of imaging data that has been acquired through light microscopy experiments. This course is aimed at all researchers who are looking to work with light microscopy imaging data, or to refresh their knowledge on some of the key fundamentals.
Prerequisites
Some prior experience with acquiring/working with light microscopy data would be useful, but isn’t necessary. This course is aimed at anyone who is looking to work with light microscopy imaging data in their research projects.
No python experience is necessary or assumed, but you will get more out of the course if you know some basics e.g. from the online Software Carpentry python course.
Please bring a laptop (Windows, Mac or Linux) to the lesson. Before the start of the course, please follow the setup instructions so that your laptop is ready to run the material in the lessons.
Please attempt the steps below before attending the course. However, if you would prefer to work through this with an instructor’s help, you can join the drop-in session at the start of the first day of the course.
Download Data
During these lessons we will be using two microscopy images and
creating images of our own. Create an empty folder somewhere on your
computer to use during the course, this will be your
working directory. You can name it anything you like but we
recommend microscopy-ideas.
Download 00001_01.ome.tiff (CC BY 4.0 Licence) from the open microscopy environment pages to your working directory.
Download Plate1-Blue-A-12-Scene-3-P3-F2-03.czi (CC BY 4.0 Licence) from the open microscopy environment pages to your working directory.
Install conda
During these lessons we will use the napari image viewer and BioIO to load imaging data files of various file formats.
We will use conda to install / manage these packages. If you already have conda installed (e.g. via Miniforge, Anaconda or similar), you can skip to the install python packages section below.
Otherwise, download the latest Miniforge distribution of Python for your operating system. Then install as below:
- Double click on the downloaded
.exefile - If you get a “Windows protected your PC” pop-up from Microsoft Defender SmartScreen, click on “More info” and select “Run anyway”
- Follow through the installer using all of the defaults for installation except make sure to check Add Miniforge3 to my PATH environment variable.
Open a terminal. (for macOS - this is done via
Launchpad > Other Application > Terminal)Type the following into the terminal and click Enter (or Return depending on your keyboard).
- Type the following into the terminal, then
Tabto autocomplete the full file name. The name of the file you just downloaded should appear. Press Enter.
- Follow the text-only prompts in the terminal. To move through the text, press Spacebar.
- Type
yesand press Enter to approve the license. - Press Enter to approve the default location for the files.
- Type
yesand press Enter to prepend Miniforge to your PATH (this makes the Miniforge distribution the default Python).
If you encounter issues installing / using Miniforge, you can download and install Anaconda instead.
(The installation instructions above are modified from the Carpentries workshop template - CC BY 4.0)
Install python packages
The remaining instructions are written assuming you will be installing and running the software from a terminal. Follow the instructions below to open a terminal on your operating system.
- Windows (if you used Miniforge): Click Start > Search for Miniforge Prompt > Click to Open
- Windows (if you used Anaconda): Click Start > Search for Anaconda Prompt > Click to Open
- macOS: Launchpad > Other Application > Terminal
- Linux: Open a terminal window
Run the commands below (using the dropdown for your operating system) in the terminal. Lines starting with # are comments and do not need to be run. You can run the commands by copy and pasting them into the terminal and pressing the Enter key.
BASH
# Make sure conda is up to date
conda update -n base conda

# This line will create a "virtual environment" (called napari-env)
# that will contain all of the software that will be used in the lessons
conda create -y -n napari-env -c conda-forge python=3.12

# Activate the napari-env virtual environment.
# Running this should change the terminal prompt to '(napari-env)'.
conda activate napari-env

# Install napari and plugins using pip
pip install "napari[all]" napari-bioio-reader bioio-cziBASH
# Make sure conda is up to date
conda update -n base conda

# This line will create a "virtual environment" (called napari-env)
# that will contain all of the software that will be used in the lessons
conda create -y -n napari-env -c conda-forge python=3.12 napari pyqt

# Activate the napari-env virtual environment.
# Running this should change the terminal prompt to '(napari-env)'.
conda activate napari-env

# Install czi file reader
pip install napari-bioio-reader bioio-cziIf you’re new to running commands in the terminal you may be alarmed if running some of these commands results in a lot of text output to the screen. This is normal and usually helpful for checking things are working OK. For our purposes you can ignore it. If you see the word ERROR appear near the end (often highlighted in a different colour) it is possible something has gone wrong. In this case the best place to start is any messages in the text expanding on the source of the error.
Post Setup Checks
Before starting the course it is important to check that your setup is working.
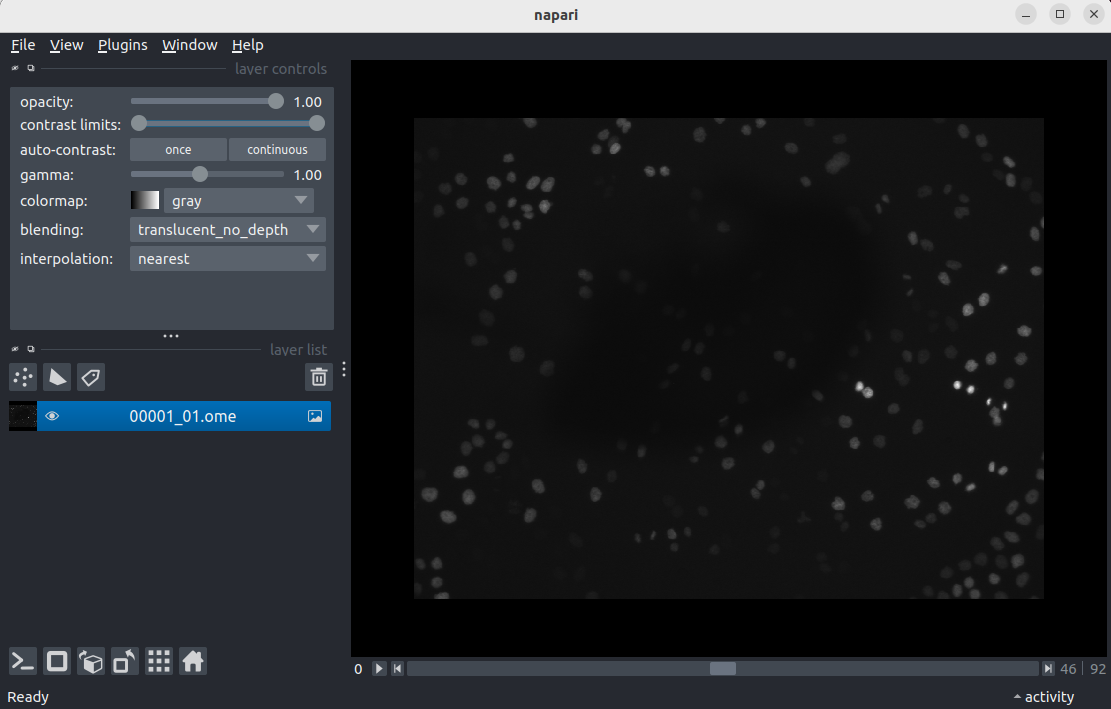
Check napari opens a tiff image.
Any napari installation should be able to open a tiff image. Start
napari. Note that if you’re already in the napari-env virtual
environment from the installation steps it is not necessary to run
conda activate napari-env.
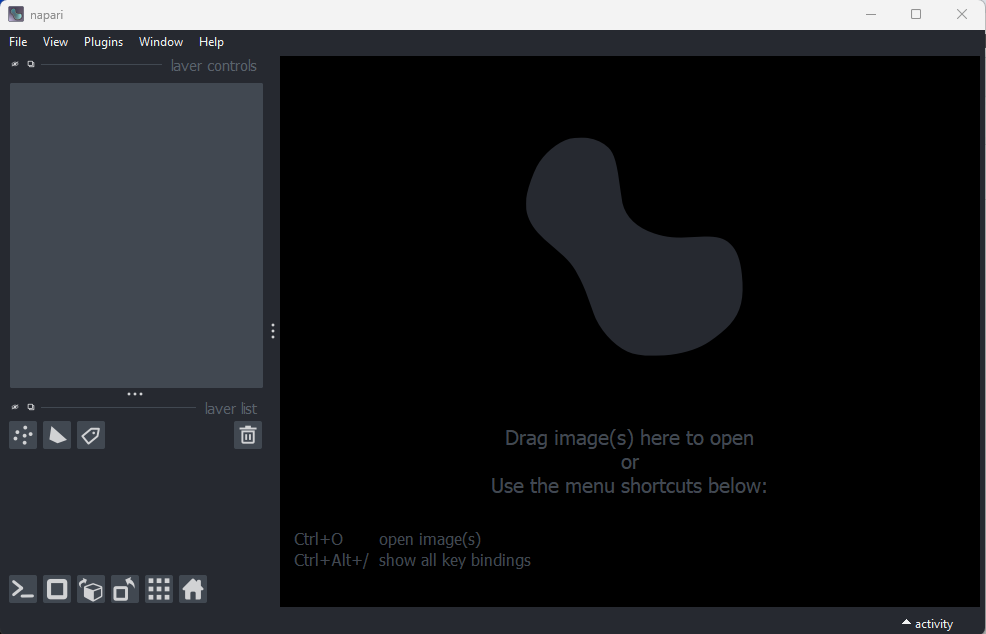
Note: Napari may take a few minutes to open the first time. You should now see the napari viewer like this …
Open a file with
File > Open file(s)...
- Navigate to the directory where you saved
00001_01.ome.tiffearlier on. - Select
00001_01.ome.tiffand click open. - If you see a
Choose readerdialog, selectnapari builtins.
Close napari: File > exit
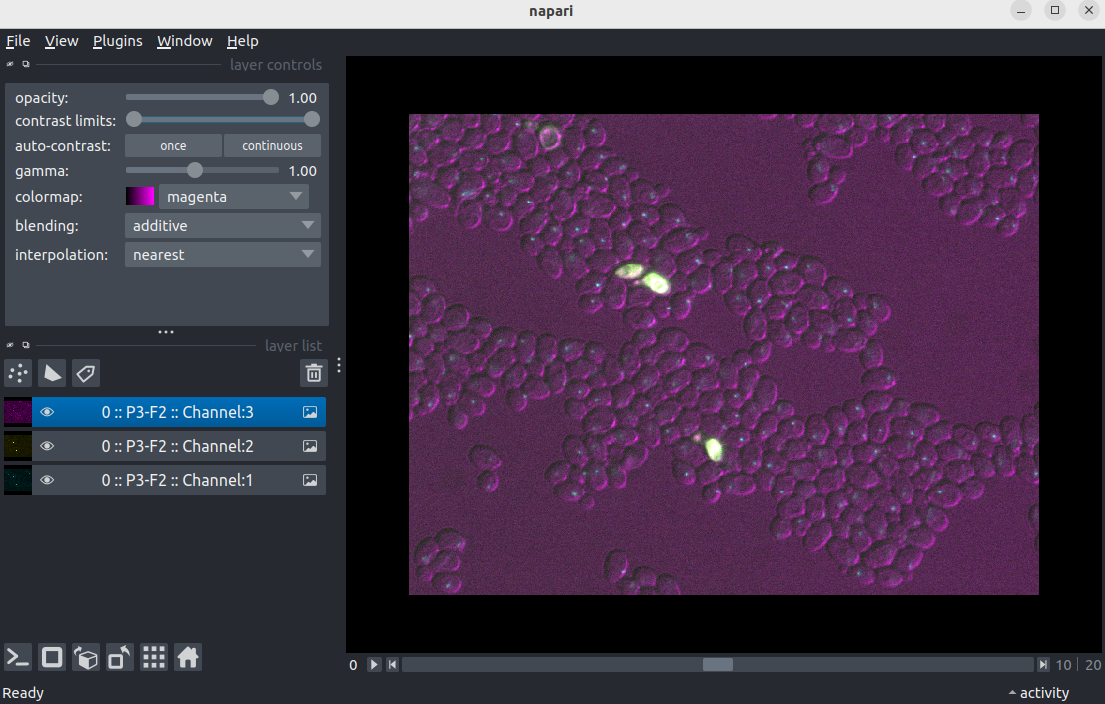
Check napari opens a czi image.
During the course we’ll be working with czi images. To open these the BioIO package is needed. Let’s check this package is working.
Start napari. Note that if you’ve already done the previous test
(tiff image) then it should not be necessary to run
conda activate napari-env. However, it is necessary to
restart napari to ensure the image display is correctly formatted.
File > Open file(s)...
- Navigate to the directory where you saved
Plate1-Blue-A-12-Scene-3-P3-F2-03.czito earlier on. - Select
Plate1-Blue-A-12-Scene-3-P3-F2-03.cziand click open. - If you see a
Choose readerdialog, selectBioio Reader.
Note: the Bioio Reader automatically installs the
bioio-bioformats reader, which has additional java
dependencies. The first time you open the czi image, you
may see lots of text printed to the terminal as it downloads these extra
files. This may take up to 5 minutes - so give it some time. This will
only happen once, and the czi image will open much faster
next time.
Potential error
On some Windows systems bioio-bioformats dependencies
prevent czi files from opening in napari. If this is the
case, napari may crash with the following error message:
failed with error: bioformats does not support the image
Uninstalling the bioio-bioformats reader (which is not
used in this material) will fix this issue:
Restart napari and try opening
Plate1-Blue-A-12-Scene-3-P3-F2-03.czi again.
Close napari: File > exit