Defacing
Table of contents
- Why Deface?
- What are we using to deface?
- Running the defacing
- Interpreting Output
- Running FastSurfer on the Defaced NiIfTI
Now that we understand what the FastSurfer results look like, we can deface the images and rerun to understand any impact that may have.
Your objectives are:
- Setup the defacing tool using the XNAT Container Service
- Run your images through the defacing algorithm
- Run the results through FastSurfer
Why Deface?
Whilst we have already removed PHI from the DICOM metadata, there’s still a risk of re-identification from the image data itself. In capturing high resolution structural images of the brain, we tend to capture the face which makes the data inherently identifiable. This is especially true if volumetric reconstructions are performed. In order to preserve patients’ confidentiality and privacy the voxel data itself must be edited to reduce this risk.
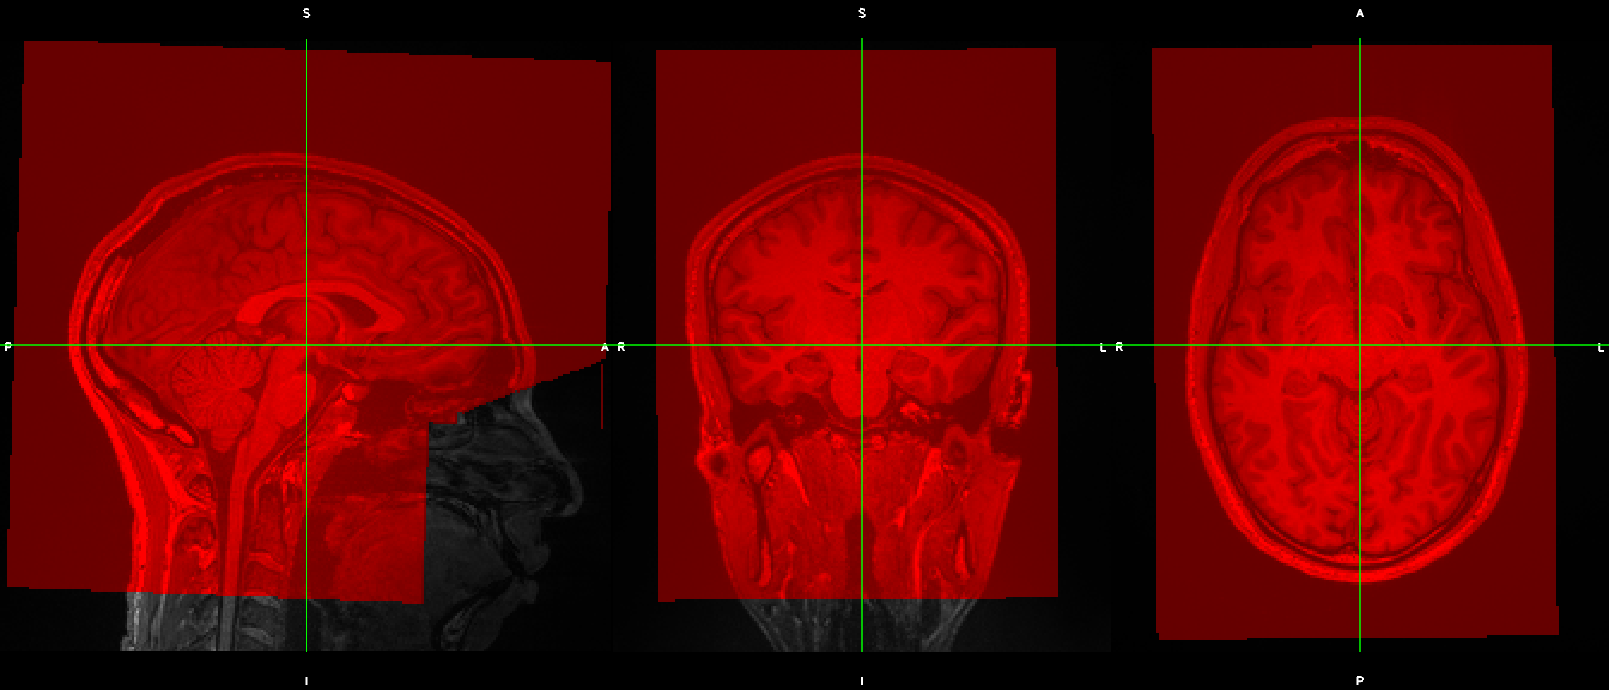
Using a defacing algorithm is one such approach that seeks to remove the identifiable face region, whilst preserving the brain and structures of interest. Some methods simply blur the facial region, others set the voxels to a set value (usually 0), while others attempt to replace the facial features with an average face. For example, the red outline in the image below shows what the defacing algorithm we’ll be running will retain.
What are we using to deface?
Running the defacing
Again we’re taking advantage of a prebuilt and configured container that has the tool that we want to run. We’re also leveraging the power of the server that the container is running on, instead of using our local machines.
To run the defacing:
- Go to your project
- Go to “Project Settings” in the “Actions” menu
- Go to “Container Service -> Configure Commands”
- Enable the “Defaces a T1 Nifti scan” command
- Go to an imaging session in your project
- Under the “Actions menu”, click “Run Containers” and select “Defaces a T1 Nifti scan”
- In the “Scan” dropdown, select a T1 scan that you have generated NIfTIs for
- Ensure that “Resource” has auto-detected “NIFTI”
- Click “Run Container” to begin the defacing
- You can monitor the processing from the “History” panel at the bottom of the imaging session page.
- Once it is complete you will have a “DEFACED” Resource generated at the scan level
Interpreting Output
To look at the result of the defacing, download the resource generated following the following instructions:
- Navigate to the imaging session that you have defaced
- Click “Manage Files” in the “Actions” to load the file manager
- Download both the original NIfTI image (in the NII resource) and the nii.gz file under “scans/<your t1 scan>/NIFTI-DEFACED”
- Extract the files to get the NIfTI files both before and after defacing.
- View the NifTI files locally to observe the effects of the defacing
Running FastSurfer on the Defaced NiIfTI
Now that you have removed facial features from the images, we’d like to see if this will have any downstream effect on the FastSurfer results.
- Go to your project
- Go to “Project Settings” in the “Actions” menu
- Go to “Container Service -> Configure Commands”
- Enable the “DEFACED DATA - Converts defaced NIFTI to 256 conformed MGZ file” command
- Enable the “DEFACED DATA - Run FastSurfer pipeline on a defaced conformed T1 MGZ” command
- Rerun the FastSurfer analysis using the version of the commands for defaced data on the defaced NIfTI and again look at the results.