DICOM 101 and Exploring the Data
Table of contents
- Downloading the IBASH dataset
- Understanding DICOM format files
- Viewing images locally
- Viewing the DICOM metadata locally
Your clinical collaborator has received imaging data from the three clinical sites (Metropolis General Hospital, Avengers HQ Medical Centre, and Professor Charles Xavier School for the Gifted), and have provided it to you in a folder.
Your objectives are:
- Access and download the imaging data locally
- Extract it locally and understand how it is structured
- View the images locally
- View the DICOM metadata locally
Downloading the IBASH dataset
- Download the imaging data from your collaborator: ibash-learners.zip
- (Ask the course lead if you have any issues)
- Unzip the data and have a look at how the files are organised on disk.
- Your extracted files will have the directory structure as seen below
- Each folder contains the imaging data for a single imaging study
.
├── 1908460
├── 2070607
├── 3085612
├── 3089130
├── 3814135
├── 4094813
├── 4822218
├── 5812567
├── 5812567-2
├── 6258754
└── 9083868
- Within each study, there is a folder for each imaging series.
- e.g. for session
1908460:
- e.g. for session
1908460
├── 1001
├── 1101
├── 501
├── 601
├── 701
├── 801
└── 901
- The actual images (and metadata) are held in the
DICOMfolder with.dcmfiles in each of these series folders- e.g. for series
901of session1908460
- e.g. for series
└── 901
    └── DICOM
        ├── 1908460.MR.IBASH.901.1008.20180901.181329.vzfs7j.dcm
        ├── 1908460.MR.IBASH.901.1009.20180901.181329.vzfs8k.dcm
        ├── 1908460.MR.IBASH.901.1010.20180901.181329.vzfs9l.dcm
        ├── 1908460.MR.IBASH.901.1011.20180901.181329.w03feq.dcm
        ├── 1908460.MR.IBASH.901.1012.20180901.181329.w03ffr.dcm
        ├── 1908460.MR.IBASH.901.1013.20180901.181329.w03fgs.dcm
        ├── 1908460.MR.IBASH.901.1014.20180901.181329.w1eoiv.dcm
If you’re not familiar with DICOM or would like a refresher read on to the next section. Otherwise you might like to skip to Viewing images locally
Understanding DICOM format files
DICOM (Digital Imaging and Communications in Medicine) is an internationally accepted standard of formats and protocols for viewing, storing, retrieving and sharing digital medical images and associated data. It defines how data is transferred across networks, how it is structured, stored onto media, as well as details about compression, security, display and more. We’ll be focussing on DICOM in its context as an imaging file format. It is often the end usable format that is produced by medical imaging devices (e.g. MRI machines, ultrasounds, etc).
A DICOM object (such as an instance encoded and stored in a file that often has the extension .dcm at the end) is a set of data elements that describe a physical entity (e.g. an MRI, radiograph, CT slice, plan, etc). Each data element is a unit of information with defined datatype and structure (e.g patient name, slice thickness, acquisition time). Standard elements are indexed by a numeric tag and name. You can see a list of tags and their names in the DICOM standard and on resources online. An important distinction is between public tags that are well defined by the DICOM standard, and private tags that can be used to store additional information. Private elements have the first part of their tag (i.e. the group number) as odd. We need to be aware of private tags as they can contain useful information we wish to keep, or PHI that we need to remove.
The image below shows a visual representation of what a DICOM file contains:
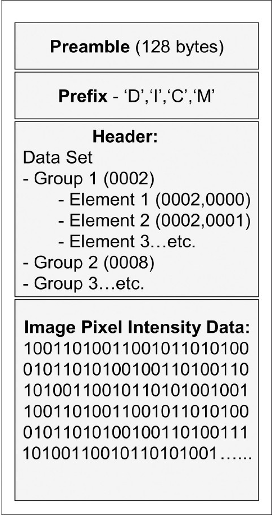
DICOM files contain these data elements (also called tags) as metadata in a header, as well as pixel data for the image itself. We need to be aware that DICOM generated in clinical settings almost always contains PHI - both in the header and potentially in the pixel data (e.g. burned in data or the image itself). This header information within DICOM is useful as it contains information that allows the identification of the image’s origin, who the patient is, the acquisition parameters of the study and so on. This information is present in each DICOM file and so can be used even if only a single image within a study is taken in isolation. The folder structure we saw previously is largely for our convenience as all needed information about hierarchical relationships is contained in the .dcm file itself.
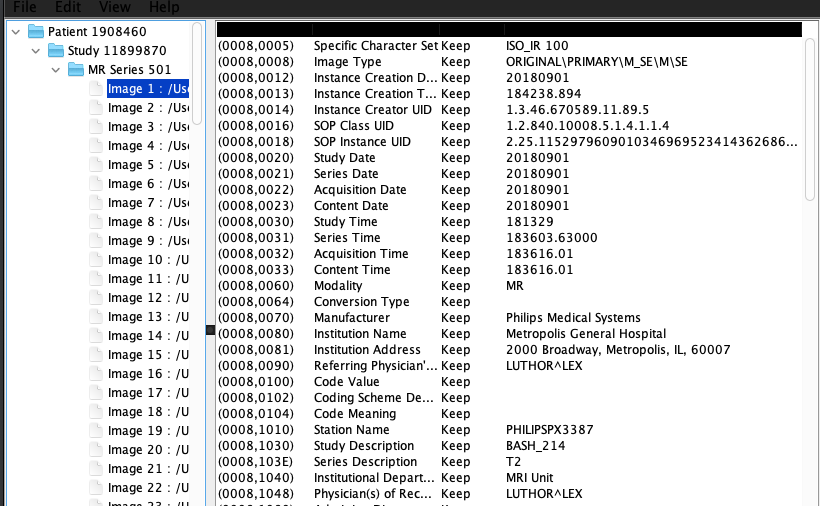
The image below shows an example of some the metadata in a DICOM object. These are all public data elements show, so their group tag number is even (e.g. 0008)
We’ve listed some more resources around DICOM in the DICOM Resources page. These go more in depth about what DICOM and how it is used.
Viewing images locally
In order to view DICOM files on your local computer, you’ll need to install a DICOM viewer. Feel free to use whatever one you’d like.
Some options:
- Weasis Medical Viewer (cross-platform)
- Ginkgo CADx (cross-platform)
- Horos (MacOS only)
Once you have a viewer installed, open the IBASH study files and make sure you can understand how the data is structured. Feel free to discuss with each other and to ask the project leads!
Viewing the DICOM metadata locally
Once you’re comfortable with the basic info and opening the files, it’s time to look at the header information.
Most DICOM viewers will include the ability to open and view the metadata but some additional options:
- DicomBrowser(cross-platform, GUI)
- DCMTK - DICOM Toolkit(cross-platform, CLI)
- Pydicom(cross-platform, Python library)
See if you can identify common tags such as StudyTime or PatientName, as well as any manufacturer added additional information.
After you’ve managed to view the DICOM metadata with your chosen viewer or DicomBrowser, you may wish to see if you can use DCMTK or Pydicom to look at header information.