What is an image?
Last updated on 2025-11-04 | Edit this page
Estimated time: 55 minutes
Overview
Questions
- How are images represented in the computer?
Objectives
Explain how a digital image is made of pixels
Find the value of different pixels in an image in Napari
Determine an image’s dimensions (numpy ndarray
.shape)Determine an image’s data type (numpy ndarray
.dtype)Explain the coordinate system used for images
In the last episode, we looked at how to view images in Napari. Let’s take a step back now and try to understand how Napari (or ImageJ or any other viewer) understands how to display images properly. To do that we must first be able to answer the fundamental question - what is an image?
Pixels
Let’s start by removing all the layers we added to the Napari viewer last episode. Then we can open a new sample image:
Click on the top layer in the layer list and shift + click the bottom layer. This should highlight all layers in blue.
Press the remove layer button

Go to the top menu-bar of Napari and select:
File > Open Sample > napari builtins > Human Mitosis
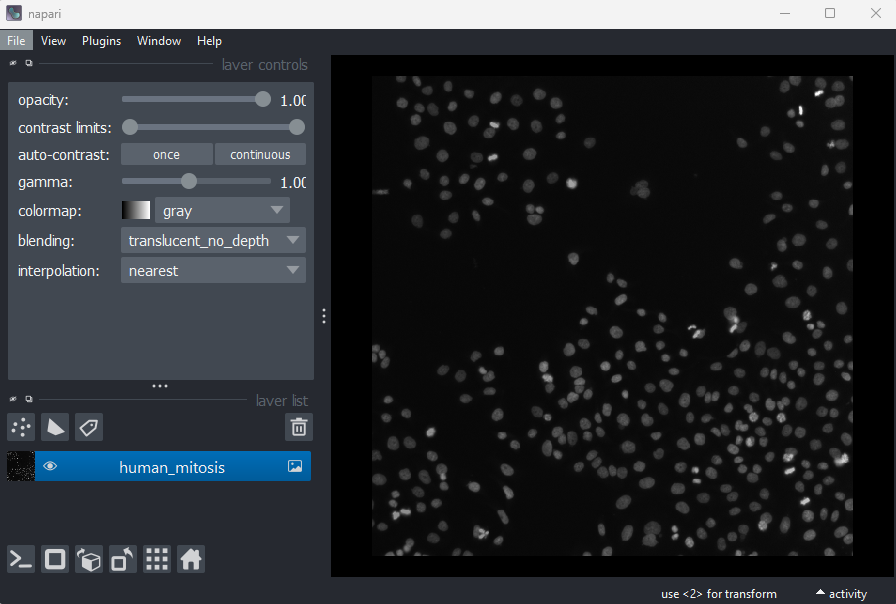
This 2D image shows the nuclei of human cells undergoing mitosis. If we really zoom in up-close by scrolling, we can see that this image is actually made up of many small squares with different brightness values. These squares are the image’s pixels (or ‘picture elements’) and are the individual units that make up all digital images.
If we hover over these pixels with the mouse cursor, we can see that each pixel has a specific value. Try hovering over pixels in dark and bright areas of the image and see how the value changes in the bottom left of the viewer:
You should see that brighter areas have higher values than darker areas (we’ll see exactly how these values are converted to colours in the image display episode).
Images are arrays of numbers
We’ve seen that images are made of individual units called pixels
that have specific values - but how is an image really represented in
the computer? Let’s dig deeper into Napari’s Image
layers…
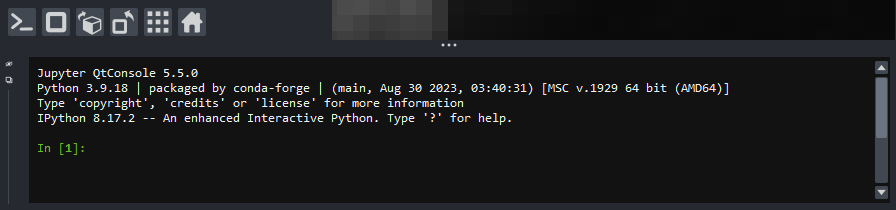
First, open Napari’s built-in Python console by pressing the console
button ![]() . Note
this can take a few seconds to open, so give it some time:
. Note
this can take a few seconds to open, so give it some time:
Console readability
You can increase the font size in the console by clicking inside it, then pressing Ctrl and + together. The font size can also be decreased with Ctrl and - together.
Note that you can also pop the console out into its own window by
clicking the small ![]() icon on the left side.
icon on the left side.
Let’s look at the human mitosis image more closely - copy the text in the ‘Python’ cell below into Napari’s console and then press the Enter key. You should see it returns text that matches the ‘Output’ cell below in response.
All of the information about the Napari viewer can be accessed
through the console with a variable called viewer. A
viewer has 1 to many layers, and here we access the top
(first) layer with viewer.layers[0]. Then, to access the
actual image data stored in that layer, we retrieve it with
.data:
PYTHON
# Get the image data for the first layer in Napari
image = viewer.layers[0].data

# Print the image values and type
print(image)
print(type(image))
OUTPUT
[[ 8  8  8 ... 63 78 75]
 [ 8  8  7 ... 67 71 71]
 [ 9  8  8 ... 53 64 66]
 ...
 [ 8  9  8 ... 17 24 59]
 [ 8  8  8 ... 17 22 55]
 [ 8  8  8 ... 16 18 38]]

 <class 'numpy.ndarray'>
You should see that a series of numbers are printed out that are
stored in a Python data type called a numpy.ndarray.
Fundamentally, this means that all images are really just arrays of
numbers (one number per pixel). Arrays are just rectangular grids of
numbers, much like a spreadsheet. Napari is reading those values and
converting them into squares of particular colours for us to see in the
viewer, but this is only to help us interpret the image contents - the
numbers are the real underlying data.
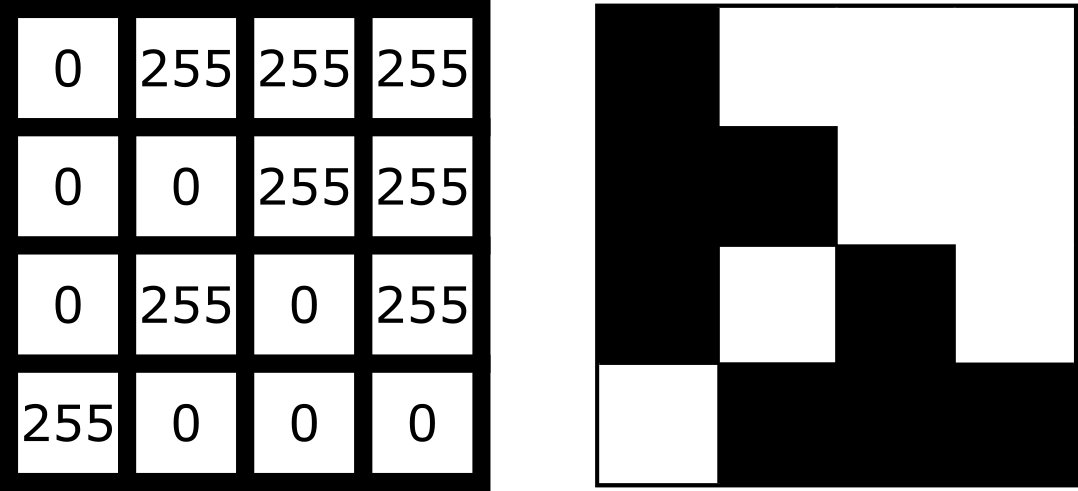
For example, look at the simplified image of an arrow below. On the left is the array of numbers, with the corresponding image display on the right. This is called a 4 by 4 image, as it has 4 rows and 4 columns:
In Napari this array is a numpy.ndarray. NumPy is a popular python package that
provides ‘n-dimensional arrays’ (or ‘ndarray’ for short). N-dimensional
just means they can support any number of dimensions - for example, 2D
(squares/rectangles of numbers), 3D (cubes/cuboids of numbers) and
beyond (like time series, images with many channels etc. where we would
have multiple rectangles or cuboids of data which provide further
information all at the same location).
Creating an image
Where do the numbers in our image array come from? The exact details of how an image is created will depend on the type of microscope you are using e.g. widefield, confocal, superresolution etc. In general though, we have 3 main parts:
- Sample: the object we want to image e.g. some cells
- Objective lens: the lens that gathers the light and focuses it for detection
- Detector: the device that detects the light to form the digital image e.g. a CCD camera
To briefly summarise for a fluorescence microscopy image:
an excitation light source (e.g. a laser) illuminates the sample, and
this light is absorbed by a fluorescent label. This causes it to emit
light which is then gathered and focused by the objective lens, before
hitting the detector. The detector might be a single element (e.g. in a
laser-scanning microscope) or composed of an array of many small, light
sensitive areas - these are physical pixels, that will correspond to the
pixels in the final image. When light hits one of the detector elements
it is converted into electrons, with more light resulting in more
electrons and a higher final value for that pixel.
The important factor to understand is that the final pixel value is only ever an approximation of the real sample. Many factors will affect this final result including the microscope optics, detector performance etc.
Read the ‘A simple microscope’ section of Pete Bankhead’s bioimage book.
- What are some factors that influence pixel values?
- Can you come up with suggestions for any more?
Image dimensions
Let’s return to our human mitosis image and explore some of the key features of its image array. First, what size is it?
We can find this out by running the following in Napari’s console:
OUTPUT
(512, 512)The array size (also known as its dimensions) is stored in the
.shape. Here we see that it is (512, 512)
meaning this image is 512 pixels high and 512 pixels wide. Two values
are printed as this image is two dimensional (2D), for a 3D image there
would be 3, for a 4D image (e.g. with an additional time series) there
would be 4 and so on…
Image data type
The other key feature of an image array is its ‘data type’ - this
controls which values can be stored inside of it. For example, let’s
look at the data type for our human mitosis image - this is stored in
.dtype:
OUTPUT
dtype('uint8')We see that the data type (or ‘dtype’ for short) is
uint8. This is short for ‘unsigned integer 8-bit’. Let’s
break this down further into two parts - the type (unsigned integer) and
the bit-depth (8-bit).
Type
The type determines what kind of values can be stored in the array, for example:
- Unsigned integer: positive whole numbers
- Signed integer: positive and negative whole numbers
- Float: positive and negative numbers with a decimal point e.g. 3.14
For our mitosis image, ‘unsigned integer’ means that only positive whole numbers can be stored inside. You can see this by hovering over the pixels in the image again in Napari - the pixel value down in the bottom left is always a positive whole number.
Bit depth
The bit depth determines the range of values that can be stored e.g. only values between 0 and 255. This is directly related to how the array is stored in the computer.
In the computer, each pixel value will ultimately be stored in some
binary format as a series of ones and zeros. Each of these ones or zeros
is known as a ‘bit’, and the ‘bit depth’ is the number of bits used to
store each value. For example, our mitosis image uses 8 bits to store
each value (i.e. a series of 8 ones or zeros like
00000000, or 01101101…).
The reason the bit depth is so important is that it dictates the number of different values that can be stored. In fact it is equal to:
\[\large \text{Number of values} = 2^{\text{(bit depth)}}\]
Going back to our mitosis image, since it is stored as integers with a bit-depth of 8, this means that it can store \(2^8 = 256\) different values. This is equal to a range of 0-255 for unsigned integers.
We can verify this by looking at the maximum value of the mitosis image:
OUTPUT
255You can also see this by hovering over the brightest nuclei in the viewer and examining their pixel values. Even the brightest nuclei won’t exceed the limit of 255.
Dimensions and data types
Let’s open a new image by removing all layers from the Napari viewer, then copying and pasting the following lines into the Napari console:
PYTHON
from skimage import data
viewer.add_image(data.brain()[9, :, :], name="brain")
image = viewer.layers["brain"].data
This opens a new 2D image of part of a human head X-ray.
What are the dimensions of this image?
What type and bit depth is this image?
What are the possible min/max values of this image array, based on the bit depth?
Common data types
NumPy supports a very wide range of data types, but there are a few that are most common for image data:
| NumPy datatype | Full name |
|---|---|
uint8 |
Unsigned integer 8-bit |
uint16 |
Unsigned integer 16-bit |
float32 |
Float 32-bit |
float64 |
Float 64-bit |
uint8 and uint16 are most common for images
from light microscopes. float32 and float64
are common during image processing (as we will see in later
episodes).
Choosing a bit depth
Most images are either 8-bit or 16-bit - so how to choose which to use? A higher bit depth will allow a wider range of values to be stored, but it will also result in larger file sizes for the resulting images. In general, a 16-bit image will have a file size that is about twice as large as an 8-bit image if no compression is used (we’ll discuss compression in the filetypes and metadata episode).
The best bit depth choice will depend on your particular imaging experiment and research question. For example, if you know you have to recognise features that only differ slightly in their brightness, then you will likely need 16-bit to capture this. Equally, if you know that you will need to collect a very large number of images and 8-bit is sufficient to see your features of interest, then 8-bit may be a better choice to reduce the required file storage space. As always it’s about choosing the best fit for your specific project!
For more information on bit depths and types - we highly recommend the ‘Types & bit-depths’ chapter from Pete Bankhead’s free bioimage book.
Clipping and overflow
It’s important to be aware of what image type and bit depth you are using. If you try to store values outside of the valid range, this can lead to clipping and overflow.
Clipping: Values outside the valid range are changed to the closest valid value. For example, storing 1000 in a
uint8image may result in 255 being stored instead (the max value)Overflow: For NumPy arrays, values outside the valid range may be ‘wrapped around’ or create an
OverflowError, depending on what version of NumPy is installed. Older versions of NumPy may wrap the values around, so storing 256 in auint8image (max 255) would give 0, 257 would give 1 and so on… Newer versions of NumPy will raise anOverflowError.
Clipping and overflow result in data loss - you can’t get the original values back! So it’s always good to keep the data type in mind when doing image processing operations (as we will see in later episodes), and also when converting between different bit depths.
Coordinate system
We’ve seen that images are arrays of numbers with a specific shape (dimensions) and data type. How do we access specific values from this array? What coordinate system is Napari using?
To look into this, let’s hover over pixels in our mitosis image and
examine the coordinates that appear to the left of the pixel value. If
you closed the mitosis image, then open it again by removing all layers
and selecting:
File > Open Sample > napari builtins > Human Mitosis:
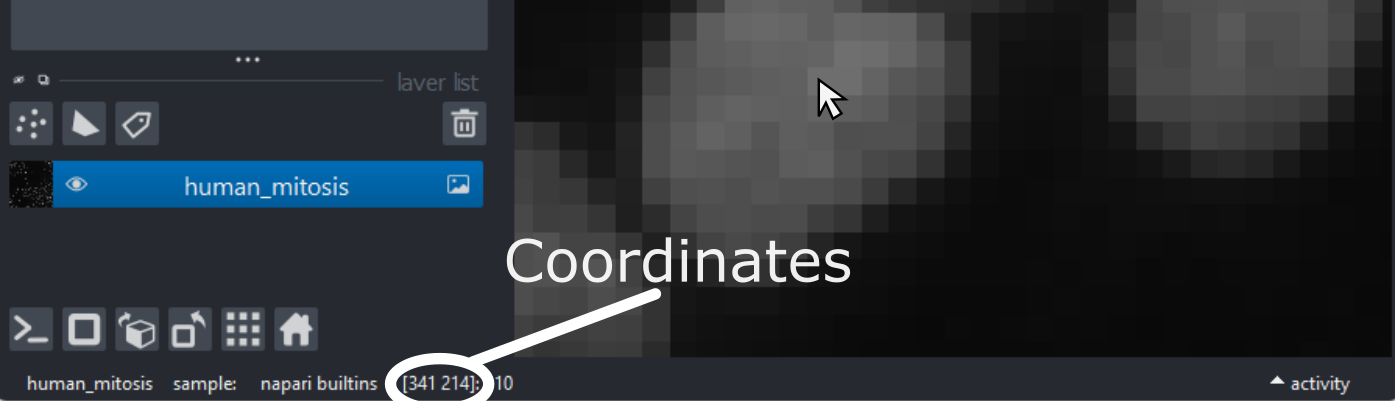
As you move around, you should see that the lowest coordinate values are at the top left corner, with the first value increasing as you move down and the second value increasing as you move to the right. This is different to the standard coordinate systems you may be used to (for example, from making graphs):
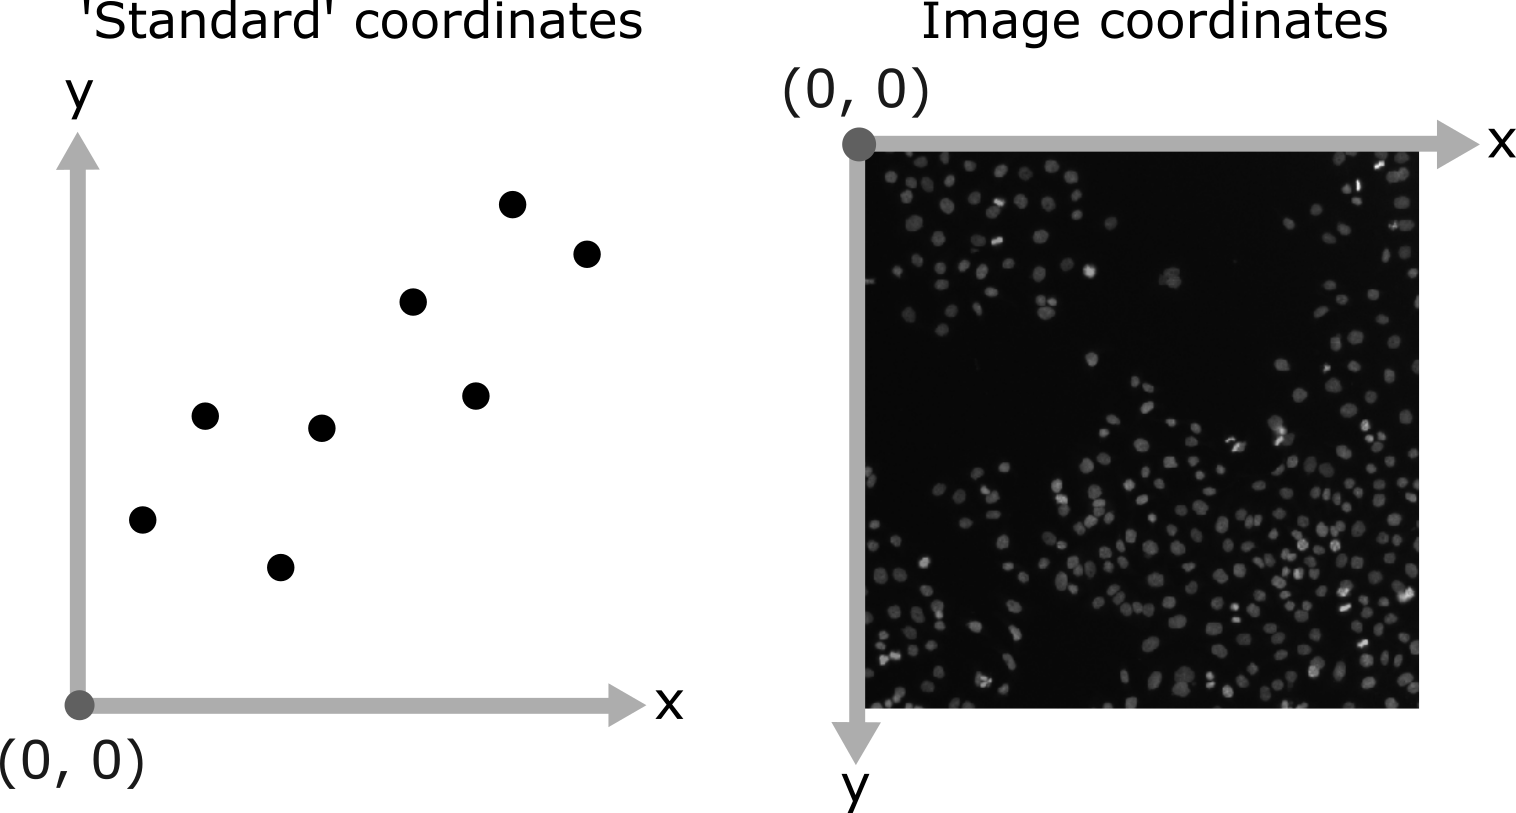
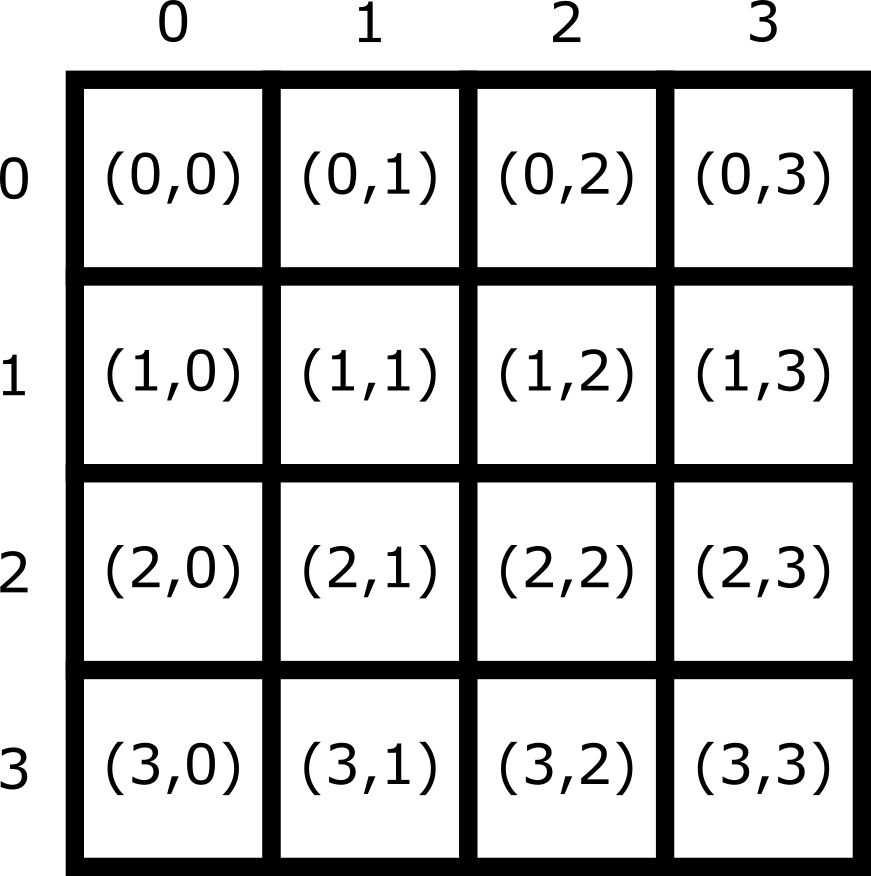
Note that Napari lists coordinates as [y, x] or [rows, columns], so e.g. [1,3] would be the pixel in row 1 and column 3. Remember that these coordinates always start from 0 as you can see in the diagram below:
For the mitosis image, these coordinates are in pixels, but we’ll see in the filetypes and metadata episode that images can also be scaled based on resolution to represent distances in the physical world (e.g. in micrometres). Also, bear in mind that images with more dimensions (e.g. a 3D image) will have longer coordinates like [z, y, x]…
Reading and modifying pixel values
First, make sure you only have the human mitosis image open (close any others). Run the following line in the console to ensure you are referencing the correct image:
PYTHON
# Get the image data for the layer called 'human_mitosis'
image = viewer.layers["human_mitosis"].data
Pixel values can be read by hovering over them in the viewer, or by running the following in the console:
Pixel values can be changed by running the following in the console:
PYTHON
# Replace y and x with the correct y and x coordinate, and
# 'pixel_value' with the desired new pixel value e.g. image[3, 5] = 10
image[y, x] = pixel_value
viewer.layers["human_mitosis"].refresh()
Given this information:
- What is the pixel value at x=213 and y=115?
- What is the pixel value at x=25 and y=63?
- Change the value of the pixel at x=10 and y=15 to 200. Check the new value - is it correct? If not, why not?
- Change the value of the pixel at x=10 and y=15 to 300. Check the new value - is it correct? If not, why not?
3
OUTPUT
200The new value is correct. If you zoom into the top left corner of the image, you should see the one bright pixel you just created.
4
ERROR
OverflowError                             Traceback (most recent call last)
Cell In[8], line 1
----> 1 image[15, 10] = 300

OverflowError: Python integer 300 out of bounds for uint8
An OverflowError occurs when you try to update this
pixel value. This is because 300 exceeds the maximum value for this
8-bit image (max 255).
- Digital images are made of pixels
- Digital images store these pixels as arrays of numbers
- Light microscopy images are only an approximation of the real sample
- Napari (and Python more widely) use NumPy arrays to store images -
these have a
shapeanddtype - Most images are 8-bit or 16-bit unsigned integer
- Images use a coordinate system with (0,0) at the top left, x increasing to the right, and y increasing down