Introduction to Resting-state Functional MRI: A Short Preprocessing Tutorial
Functional Magnetic Resonance Imaging (fMRI) is a technique that captures a “movie” of brain activation over a certain period of time. fMRI sequences are time series (4D acquisitions) of 3D brain volumes. fMRI measures the blood-oxygen-level-dependent (BOLD) signal, an indirect measure of regional brain metabolism.
Raw resting-state functional MRI images are prone to several artifacts and variability sources. For this reason, before performing our statistical analysis, we need to apply a series of procedures that aim at removing the sources of signal that we are not interested in, to clean the ones we want to study. All these procedures together are called pre-processing. This document will guide you through the basic steps that are usually taken in the rs-fMRI pre-processing phase.
Pre-processing Software
To date, a large amount of pre-processing software packages are available and can be freely used. In this course, we will use FSL to perform pre-processing steps directly from the command line.
Data
In this tutorial, we are going to use data from one participant of the OASIS study. Data can be found in the folder oasis/fMRI_tutorial_orig First, let’s go into the directory where the functional data are!
cd data/FunctionalMRI
Now go into the subject folder and list the content to have an idea of what data we are going to use.
cd OAS30015

ls
As you can see, for fMRI processing we need high-resolution structural data (T1w in the subfolder called anat) and fMRI files, in the func subfolder.
Overview
Modern fMRI pre-processing pipelines include a variety of processes that can, or cannot, be performed depending on the acquired data quality, and study design. Today, we will have a look at some of these pre-processing steps that are most commonly used. Typical pre-processing steps include:
- EPI Distortion Correction
- Motion Correction
- Standard Space Mapping
- Spatial Smoothing
- Temporal Filtering
- Denoising
Hands-on
Structural Processing
Given the low spatial resolution and SNR of fMRI images, some registration steps in functional processing involve the use of previously computed transformation during the T1w processing. Important steps to have performed are:
In this course, these steps have already been performed for you as they can take quite some time. Please don’t run these commands!
- Brain extraction with BET
bet sub-OAS30015_T1w.nii.gz sub-OAS30015_T1w_bet -f 0.4 - Tissue Segmentation with FAST
fast -n 3 -b -o sub-OAS30015_T1w_bet_FAST sub-OAS30015_T1w_bet.nii.gz - Linear and Non linear T1w to MNI Standard Space Mapping
 flirt -in sub-OAS30015_T1w_bet.nii.gz  -ref /usr/local/fsl/data/standard/MNI152_T1_2mm_brain -out highres2standard -omat highres2standard.mat -cost corratio -dof 12 -searchrx -90 90 -searchry -90 90 -searchrz -90 90 -interp trilinear

 fnirt --iout=highres2standard_head --in=sub-OAS30015_T1w.nii.gz --aff=highres2standard.mat --cout=highres2standard_warp  --jout=highres2highres_jac --config=T1_2_MNI152_2mm --ref=/usr/local/fsl/data/standard/MNI152_T1_2mm --refmask=/usr/local/fsl/data/standard/MNI152_T1_2mm_brain_mask.nii.gz --warpres=10,10,10
The results from these commands can be found in the /anat folder within the subject directory
Look at the raw data!
To have an idea of how the raw data looks before any pre-processing is performed, let us visually review the images. To do so, fsleyes is a great toolbox that can be used by typing on the command line:
fsleyes func/sub-OAS30015_task-rest_run-01_bold.nii.gz &
As mentioned in the imaging data section, the & at the end of the command allows us to keep working on the command line while having a graphical application (such as fsleyes) opened. Helpful options for reviewing fMRI data in fsleyes are the movie option (![]() ) and the timeseries option (-> view -> timeseries or keyboard shortcut ⌘-3). Check them out!
) and the timeseries option (-> view -> timeseries or keyboard shortcut ⌘-3). Check them out!
EPI Distortion Correction
Some parts of the brain can appear distorted depending on their magnetic properties. One common way to correct the distortions with fMRI data is by acquiring one volume with an opposite phase-encoding direction, and merging the two types of images running TOPUP. In this dataset we don’t have the data required for TOPUP so we will skip this step. Note however that you should run it if your data allows.
Preliminary steps
For some registrations steps we will need only one volume from our fMRI timeseries. Run the following code to cut 1 volume in the middle of the functional file:
fslroi func/sub-OAS30015_task-rest_run-01_bold.nii.gz func/sub-OAS30015_task-rest_run-01_bold_1volume 80 1
Motion Correction
A big issue in raw rs-fMRI scans is the fact that participants usually tend to move during the length of the scanning session, therefore producing artifacts in the images. Head motion results in lower quality (more blurry) images, as well as creating spurious correlations between voxels in the brain. Rs-fMRI pre-processing takes care of the motion during the scan by realigning each volume within a scan to a reference volume. The reference volume is usually the first or the middle volume of the whole sequence.
To perform motion correction with fsl we use the mcflirt command:
mcflirt -in func/sub-OAS30015_task-rest_run-01_bold.nii.gz -out func/mc_sub-OAS30015_task-rest_run-01_bold
To keep track of what we are doing, it is good to add a prefix to the output describing the preprocessing steps run on it. So in this case we add mc_ (motion corrected) to our original functional file.
we can now have a look at original and motion corrected image by typing
fsleyes func/sub-OAS30015_task-rest_run-01_bold.nii.gz func/mc_sub-OAS30015_task-rest_run-01_bold &
In fsleyes we can use the options in the lower left panel to hide or move images up. Can you guess which are the spots of the images that differ most between the two scans?
Standard Space Mapping
Brain shape and size strongly vary across different individuals. However, to perform group level analysis, voxels between different brains need to correspond. This can be achieved by registering or normalizing rs-fMRI scans in native-space to a standard template. This processing step is actually made of three different steps.
-
Compute the registration of the subject T1w scan to MNI space:
This has been previously run using
flirtandfnirt(see above). The output transformation matrix is stored in theanatsubfolder and calledhighres2standard_warp.mat -
Register the fMRI to the T1w file
With the following function we compute the transformation matrix needed to bring the fMRI file to the T1w space
epi_reg --epi=func/sub-OAS30015_task-rest_run-01_bold_1volume.nii.gz --t1=anat/sub-OAS30015_T1w.nii.gz --t1brain=anat/sub-OAS30015_T1w_bet.nii.gz --out=func/func2highres -
Combine fMRI2T1w and T12MNI transformation, and apply in one go to our timeseries
# concatenate T12standard and fMRI2T1w affine transform
convert_xfm -omat func/func2standard  -concat anat/highres2standard.mat func/func2highres.mat

# concatenate T12standard non-linear and fMRI2T1w affine transform
convertwarp --ref=$FSLDIR/data/standard/MNI152_T1_2mm_brain --premat=func/func2highres.mat --warp1=anat/highres2standard_warp --out=func/func2standard_warp

applywarp --ref=$FSLDIR/data/standard/MNI152_T1_2mm_brain --in=func/mc_sub-OAS30015_task-rest_run-01_bold.nii.gz  --out=func/MNI_mc_sub-OAS30015_task-rest_run-01_bold.nii.gz  --warp=func/func2standard_warp
The output of these functions is stored in func/MNI_mc_sub-OAS30015_task-rest_run-01_bold.nii.gz . This is our fMRI scan in MNI space. You can check this by typing
# check characteristics (dimensions) of the MNI functional file
fslinfo func/MNI_mc_sub-OAS30015_task-rest_run-01_bold.nii.gz

# check characteristics (dimensions) of the native-space functional file
fslinfo func/sub-OAS30015_task-rest_run-01_bold.nii.gz
Let’s also have a look at the MNI file!
fsleyes func/MNI_mc_sub-OAS30015_task-rest_run-01_bold.nii.gz &
Spatial Smoothing
With spatial smoothing, we are referring to the process of averaging the data points (voxels) with their neighbors. The downside of smoothing is that we lose spatial specificity (resolution). However, this process has the effect of a low-pass filter, removing high frequency and enhancing low frequency. Moreover, spatial correlations within the data are more pronounced and activation can be more easily detected.
In other words: Smoothing fMRI data increases signal-to-noise ratio.
The standard procedure for spatial smoothing is applying a gaussian function of a specific width, called the gaussian kernel. The size of the gaussian kernel determines how much the data is smoothed and is expressed as the Full Width at Half Maximum (FWHM). 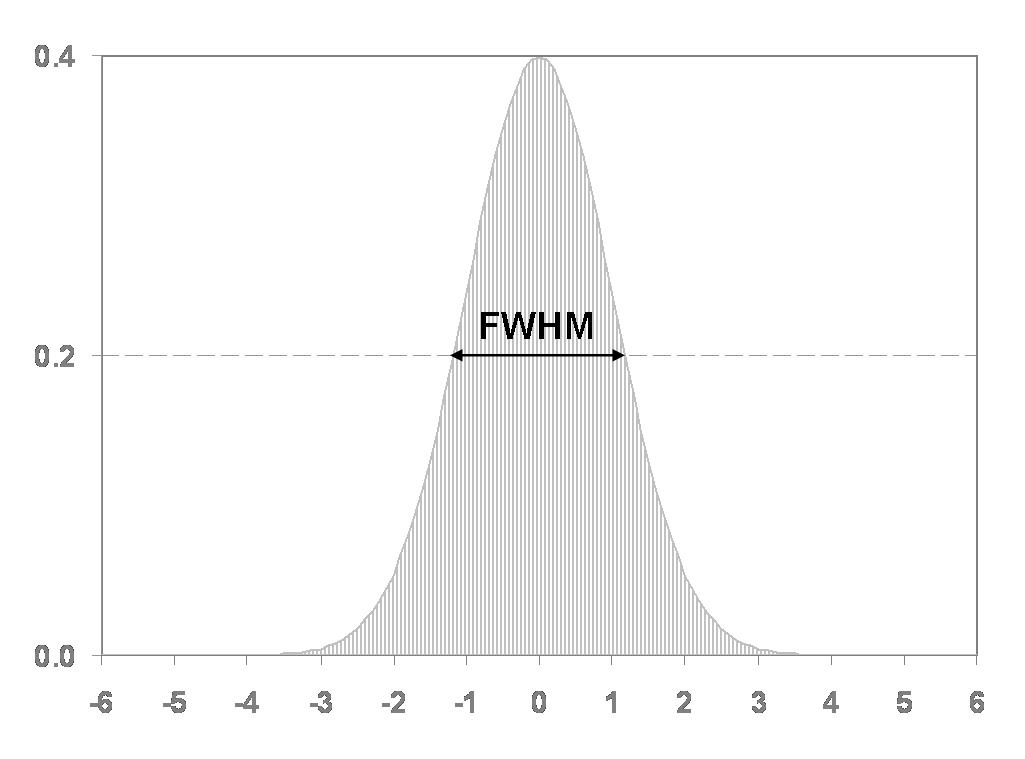
There is no standard value for smoothing fMRI data, FWHM usually varies from 2mm to 8mm. A good compromise is to use a FWHM of 4. This can be applied with fslmaths :
fslmaths func/MNI_mc_sub-OAS30015_task-rest_run-01_bold.nii.gz -s 4 func/sMNI_mc_sub-OAS30015_task-rest_run-01_bold.nii.gz
By changing the “-s” option we can change the FWHM, increasing or decreasing the smoothing. Try it out and check the results with fsleyes!
Temporal Filtering
Rs-fMRI timeseries are also characterized by non-interesting low-frequency drift due to physiological (e.g. respiration) or physical (scanner-related) noise. For this reason, we usually apply an high-pass filter that eliminates signal variations due to low-frequency. To do so, a voxel timeseries can be represented in the frequency domain, and low frequency can be set to 0.
fslmaths func/sMNI_mc_sub-OAS30015_task-rest_run-01_bold.nii.gz -bptf 45.45 1 func/hpsMNI_mc_sub-OAS30015_task-rest_run-01_bold.nii.gz
Resting state Networks and Noise Components
Once the data is processed we can try to run an independent component analysis (ICA) on the fMRI timeseries. ICA is usually performed for two reasons:
- Identify resting state networks, i.e. groups of areas that covary (work) together. This step is often done at the group level.
- Identify further sources of noise from the data, and further remove them (this is called denoising).
ICA can be run using the melodic command from FSL.
melodic -i func/hpsMNI_mc_sub-OAS30015_task-rest_run-01_bold.nii.gz -o func/ICA -m /usr/local/fsl/data/standard/MNI152_T1_2mm_brain_mask.nii.gz
The -m option specifies a mask that we want to run the analysis in. In this case we use a standard brain mask provided by FSL but you could also create your own mask using the structural segmentation.
Melodic will create a directory called “ICA” in our func folder
Open the melodic_IC.nii.gz file in the output folder using fsleyes, threshold the values to 3 (this value is commonly used as a threshold for this task).
Now chose a nice colormap (usually red) and overlay this to a standard brain template (-> File -> Add Standard).
Can you recognize some of the canonical resting-state networks?
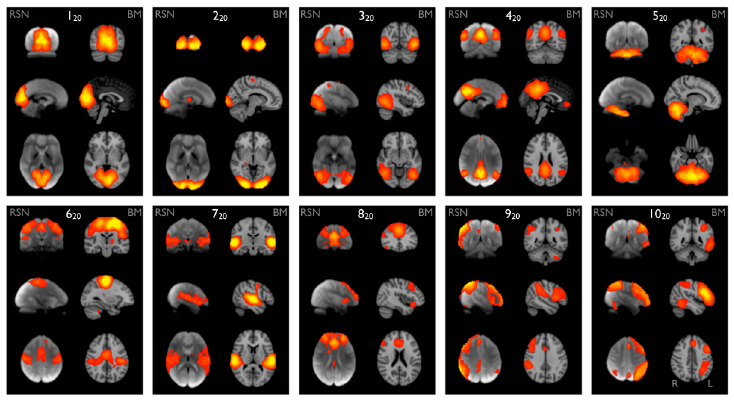
Do you see some components that you think might be linked to artefacts?
You can clean the original signal by writing them down and running:
fslregfilt -i func/sMNI_mc_sub-OAS30015_task-rest_run-01_bold.nii.gz -o func/denosised_sMNI_mc_sub-OAS30015_task-rest_run-01_bold.nii.gz -d func/ICA/melodic_mix -f " 1,2,3"
with the -f option you can specify the components number that you want to clean from the signal.
Conclusion
You should now be able to fully process one fMRI scan yourself! As you know, we usually work with a bunch of data and want to automatize the pre-processing for all the scans, so that we can run it in one go.
Also following the other sections of this course, try to put all these commands in a for loop and use variables to run commands on your files.
If you want to discover some type of analysis that you can do on the processed data, check out some of these websites:
- FSLnets for network analysis of fMRI scans
- Melodic ICA and Dual regression for resting-state network connectivity
- Graph Analysis of connectivity metrics with Brain COnnectivity Toolbox
Ciao!